Measuring Techniques
245K views
lesson video
Measuring Techniques
courseFigure Drawing FundamentalsFull course (57 lessons)
-20%
$120
$150
You save $30
assignments 46 submissions
Huba Hevele
I focused on accuret proportions,and flowing gesture with these,and added some structure to them afterwards. Please tell me if you see anything wrong with them,thanks have a good day.
LESSON NOTES

The first and most important part of a figure drawing is the layin. Without a good layin you rarely end up with a good drawing.

proportions diagram hale

In the last lesson we learned the average proportions of the body. The problem with that is when the body moves out of the static soldier pose, those measurements change the way they are perceived by our eye. Foreshortening changes these relationships. If drawing from imagination you can remember the proportions and do your best to apply perspective to them. If drawing from a reference photo or a model we are given the opportunity to measure. A direct way to transfer the effects of perspective to our drawing.

Measuring is exclusive to observational drawing and you won't use it so much when drawing from imagination, but it's important to practice because it tunes your eye to what's correct.

Measure with your Pencil

We can use all sorts of measuring tools like calipers or string. I like to use the tool already in my hand - the pencil!

  • Hold your arm straight out, without bending the elbow. Bending the elbow will bring the measurement closer to your eye and increase the size. The measurement will be consistent if the elbow is locked.
  • Tilt your head to bring the eyes as close as possible to the pivot point at your shoulder. This is important to keep the measurements consistent throughout the whole subject. If you don't do this. When measuring around the top of the pose, the pencil will be closer to your eyes and when measuring around the feet it will be farther from your eyes. This difference in the distance makes the measurements inconsistent. Keep your eye near the shoulder to minimize this.
  • Close one eye.
  • Use the tip of the pencil as the top point of whatever you’re measuring and put your thumb at the bottom point.
  • Now that you have the unit, you can compare it to another part of the figure.
  • For example, it's very common to count how many head lengths fit in the height of the pose. Move your measurement down below the chin and note where your thumb is. Repeat that down the figure and count the units. This pose is 7.5 heads tall.

    You can do this to measure the relationship of anything in the pose, not just the head. You can say the length of this arm is the same as the length of the lower leg or whatever works for the pose.

    The approach I’m suggesting here does NOT require that the size you measured with the pencil be directly transferred to the paper at the same size. That would be called the sight-size method, where the drawing is the same size as the subject you are seeing.

    tip of the pencil as measurement

sight size method same size as the subject

Measuring Relationships

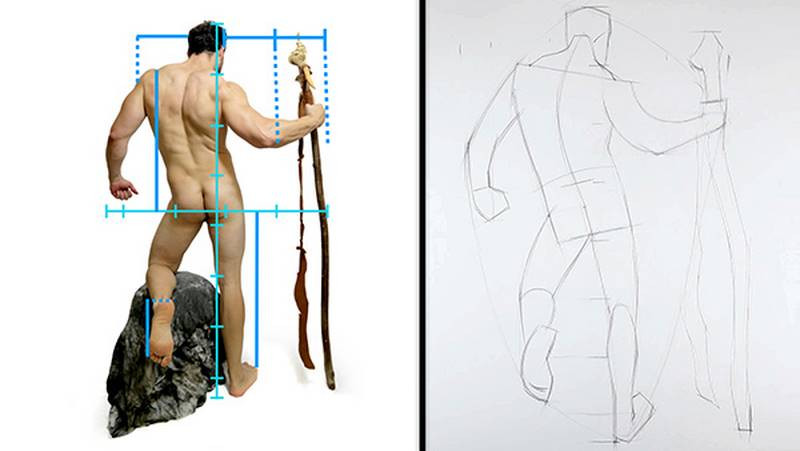
The approach I’m showing today involves measuring relationships to make the composition fit on the size surface you're working on. We’ve established that the pose is 7.5 heads tall. The size of our paper allows the pose to be about this big, so mark the top and bottom. Then break it up into 7.5 units. That tells you how big the head should be on the page and you have points for all the places where the head units lie on the pose.

measuring relationships head units of the pose

Doing this helps to prevent one of the most common rookie mistakes - progressively drawing things bigger as you go down the page, or smaller as you go down the page. This happens because we get tunnel vision.

tunnel vision common rookie mistakes

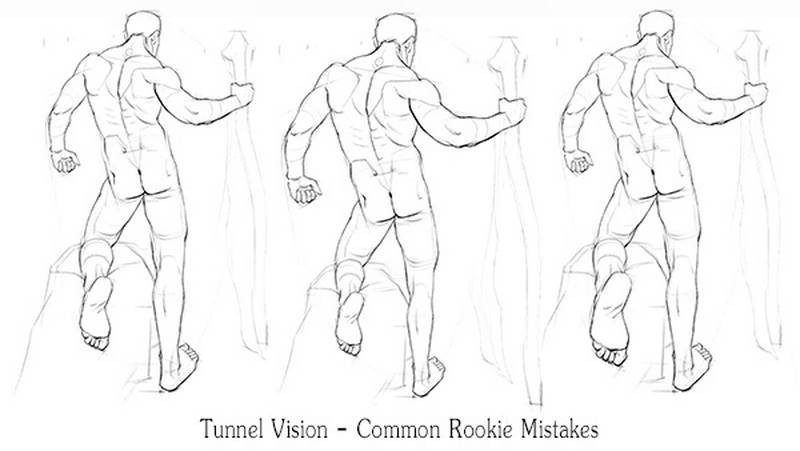
We focus on the small portion of the drawing we are currently working on. We relate things only to the things near them instead of the whole picture. And if we tend to measure things slightly bigger than they really are, the drawing will slowly get bigger and bigger as we work our way down the page. Relating the whole thing first is a way to step back and look at the big picture. Make sure the foundation works before we add the parts.

Already this tells us a lot and it makes measuring the rest of the figure much easier. We can also rotate the head unit horizontally and do the same thing for the width of the pose. Notice how in this pose the head is closer to the left side. Avoid putting it in the exact center by default, since that could create an unbalanced composition. Think about the placement of the drawing vertically AND horizontally.

At this point, you could also find the center point of the pose by dividing the height and width in half. Then find where that center point is on the model. In this pose, the center point is about here in his right glute.

Shapes and Angles

With the head units in place, we can start drawing in the shapes. Start with the largest shapes and use simple lines. The largest shape we can use is what’s called the Envelope. Use large angles connecting the outside points of the whole pose. Imagine if the pose was gift-wrapped. Doing this allows you to look at the big picture and establish its perimeter. Everything else should fit inside this shape.

established perimeter large shape

Now start observing the next largest shapes along the body. Focus on getting the angles right with simple gesture lines. Remember that a gesture line can be either a straight line, C curve, or S curve. It should capture the motion of the form. This allows you to get the big picture working without committing to any details. You can easily make corrections as you go. Once you start adding subtleties in the contours, it’s less likely that you will change things and if you do, it’s more time-consuming because you have to redo all the details. So, keep it simple and worry only about the major relationships at first. It’s also a good idea to keep your lines thin and light. Most of these initial construction lines will need to be erased later, so if you draw dark thick lines, you’ll end up with a very messy drawing.

Though we are drawing gesture lines here, it’s a bit different from the 30-second - 5-minute quick sketches we did at the beginning of this course. In the quick sketches, we were not too concerned about the proportions. Only the motion and energy. It’s hard to get accurate proportions in a 30 seconds sketch. In this lesson, we are much more concerned about proportions. As a result, we will lose some gestures because we’re not exaggerating as much, or not at all. It’s a side effect of careful measuring. Usually, my goal is to construct accurately while capturing as many gestures as possible.

side effects of careful measuring

Plumb Lines

A plumb line is an exact vertical line that you can drop to see alignments within the pose. If drawing from a model we can actually use a string with a weight at the end to determine a perfect vertical.

Here we see that the acromion process aligns with the inside of the heel. Also, the armpit aligns with the outside of the knee and ball of the foot.

We can also use horizontal alignments. Horizontal and vertical measurements are more accurate than angles. They are much easier to get right because you can align them with the edge of the paper and we tend to have a pretty clear vision in our mind of horizontal and vertical.

plumb line acromion process lines up with heel

Subtle angle variations can make a big difference. Such as measuring an angle from the head to the shoulders to find the width of the shoulders. If your angle is slightly off on both sides, the shoulders end up being wider or narrower than you intended. It’s ok to use angle relationships, I do all the time, just keep in mind that there’s more room for error. Double-check them when possible with verticals and horizontals.

Triangulation

Something that might help to measure angles is triangulation - measuring angles of 3 points instead of 2. If we’ve determined these 2 points to be correct and we’re trying to find the placement of a third, we can estimate the angle from one point and then the other.

triangulation measuring angles of 3 points

If these two estimates don’t match, well then we have to re-measure them. The actual point is probably somewhere in between. Then we can look at the triangle shape made by these points and compare that. This gives us another chance to catch a mistake since we’re looking at a shape not just the angle of a line.

Each Pose is Unique

Each pose has its own solutions, and relationships that make the most sense to measure for that particular pose. For example, in this pose the length from the elbow to the fingertips is exactly 2 head units. However, in this pose, it’s not a nice whole number. It’s a little bit less than two. So, you might need to look for other relationships that will help you find that length. A plumb line from the fingertips lines up with the edge of the pinky of the other hand. And the elbow lines up with the point directly in the middle of the chest. It's nice when things relate to whole numbers. But, sometimes you'll need to take your best guess at "a little bit less than 2". And then check it with other relationships.

negative shape space around the subject

Negative Shapes

Another trick to finding accurate shapes is to look at the negative shapes. A negative shape is the space around or between the subject. It’s the background. The shape here between the thighs is a triangular shape. This shape is easier for us to judge then the shapes of the thighs themselves because we have less preconceived opinions about what that shape should look like. So, we are more likely to make an unbiased evaluation of the negative shapes.

Trust Your Eyes

If something looks wrong, then it's wrong, no matter how many times you measured it. The mistake might be between a relationship you didn't measure or the small margins of error in the measuring compounded to make a significant mistake. Being a millimeter off while holding the pencil up, can add up to inches in your drawing. So, measuring will get you close, but it's much more important to develop your eye to see relationships without a ruler. Your eye can be a much better tool than a ruler.

train to see relationships wo a ruler

The way to develop this is to do a lot of careful drawings focusing on getting accurate proportions. When you practice these exercises, it’s important to have a feedback loop. Either have someone with a trained eye check your drawing or have a method to check it yourself.

In the premium section, I introduce two methods of practicing and checking yourself.

Details

Now that all the major shapes are in place, it’s safe to focus on the smaller parts and add the more subtle plane changes along the contours and within the forms.

What about Gesture?

This episode has been about capturing accuracy. But how important is accuracy? That’s up for debate of course.. I don’t think the answer is the same for everyone. How much do you want to change your reference? How important is it that you capture the exact likeness of the subject? Or is it more important to capture the feeling in an expressive way? There’s a balance to this and that’s partly what determines your style.

In the early stages of your learning process focus on complete accuracy. Make it as perfect as possible to tune your eye and to develop the ability to draw accurately. Don’t choose to be more expressive simply because you’re not capable of accuracy yet. Expand your abilities so that you have the choice. Lean towards accuracy when the job requires it and lean towards expression when the artwork calls for it.

For practice, start by separating the two concepts

  • Do longer careful drawings focusing on getting accurate proportions
  • And do shorter sketches focusing on gesture

longer careful drawings and gesture sketches

Eventually, the two will mold together and be part of your thought process. Ultimately during each stroke, you will be making subconscious decisions considering both accuracy and expression.

In the next video, I’ll show you how to use these principles in an actual figure drawing. I’ll take you step by step through the whole process. This video is available in the Premium Section. I also show you 2 methods of practicing measuring and checking yourself. So if you’re interested in seeing that, check out the Figure Drawing Fundamentals Course. The Full course has extended versions and a lot of examples from the lessons like, gesture, structure, bean, robo bean, mannequinization, balance, exaggeration, proportion, measuring, and shading. A lot of information and it’s very affordable.

DOWNLOADS
txt
measuring-techniques-premium-transcript.txt
11 kB
mp4
measuring-techniques-premium-720p.mp4
75 MB
jpeg
YoniPhoto-1.jpg
3 MB
ASSIGNMENTS

Choose one of the methods I describe in the lesson above. Either digital or traditional. Practice laying in a figure drawing pose and use the measuring techniques you learned. You can use the photo provided below, or any other pose you like in my pose sets.

Newest
mike mcdonald
I noticed that being really really precise didn’t really help me. The first two I did I took a super long time to measure, not really utilizing anything besides measuring. The last two I did initial layins and more of how we had been drawing, and just used the measuring alongside the process. The last two were “just as accurate” in a much shorter time
Rachel Dawn Owens
The last one looks like it got the closest to the original. You have good eyes! Keep doing what you’re doing!
Michael Longhurst
3 more that I did. In some ways they were pretty close, in others there were definitely some differences that really changed the overall look.
Michael Longhurst
Here are 3 that I did. I felt pretty good about both sitting poses, but was a bit off on the woman holding the light globe.
Rachel Dawn Owens
It’s ok if it’s not exactly like the photo when the photo reference has camera distortion. The one with the globe especially. The man’s legs too. They are too small in the photo. It would be more accurate to life to make his legs bigger. Making the standing woman’s leg larger was the correct thing to do. You don’t need to make the same mistakes as the camera. Your measurements are great.
Tommy Pinedo
Here is my sketch on using measuring techniques from this video. Dang, I was off in a few areas but I am glad I am happy with it as my first attempt using this reference :D
Tommy Pinedo
Did a third practice using a different reference. Got the height a bit wrong, but close enough. :D
Tommy Pinedo
Did another pose today. Was off on the height and certain areas. Harder when the model is not straight but good practice.
@haziz
3mo
I really struggled with the foreshortened right leg and redrew it. To some extent wish I had left it as is since I think my original may have been marginally better although far from perfect. The figure is also less angled in the original and looks fairly stiff. I was copying Proko's drawing much more than drawing from the photo of the model. Not sure this is the best way to proceed longer term. I suspect not.
Dave S
1yr
Think I was a bit off on my measurement lines . Should have used a ruler. Still a good exercise.
May Berry
1yr
Worked on 2 Poses. I compared each drawing using Concepts on my ipad, then overlayed my drawing with a fixed version. I used cranial units loosely, and paid more attention to proportions, plumb lines, and negative shapes.
Jocelynn Darlene
I did a lot of practice for this lesson, the biggest struggle for me was the legs... can never seem to get the angle right!
Filippo Galli
Pretty sure I'm leaning too much on countour-sight rather than actually measuring.
Filippo Galli
Here are the second and third batch I've done last month and didn't upload. I will be back to finish this course and more soon.
Tony Zhang
1yr
Still, these are amazing!
Jacob Granillo
What I tend to struggle is finding the horizontal planes and vertical planes.. But, what I really struggle with is finding The Horizontal and Plane. I have done two other line-ins (Not the one’s shown) and they come out really wide and squished. I would really appreciate it if there any tips to make sure the horizontal and vertical plane is correct and how to actually measure it. Thank you!
Gannon Beck
This is going to take more than a few reps.
Gannon Beck
Adjustments after doing the overlay.
Gannon Beck
This is a weak point in my game for sure. Because I draw so much when I come across methods and information that I'm not familiar with it stands out like a neon sign. I always find this exciting because I feel like I just won a scavenger hunt in the search for artistic growth. I'm looking forward to using these concepts!
maciek szczech
I drew vertical line with the ruler, divided it (7.5 heads) and followed Stan's instructions. Was not hurrying and tried to find right position of arms, hands, legs, feet and other features in relation to the figure height and width and overall figure shape and then added a bit of lines describing shadows. I have corrected position of left model hand and the right model arm, both positioned ca0.5cm too high. The final result as on the attached pictures. Just wanted to exercise and see where I am as for today.. (WHS sketchbook, A4 size, HB mechanical pencil).
Camellito
2yr
Good job. Keep working hard.
Melanie Scearce
Very accurate! Great job
hArtMann
2yr
Used all of the methods to see how well they combine.
Jack
2yr
I'm really struggling with the issue where I mess up a measurement and don't realize until it's too late, causing all of the proportions to be off. Does anyone have any advice?
@amandadame
Stan's explanation of measuring by head heights makes sense when his figure is standing more or less straight. Can someone please explain how you would go about measuring head heights for this pose? Is that still where you should start?
Gary Richardson
If you think of the borders of the reference photo, consider that it is a square, i.e. equal sides. Try using that square in your drawing. First, draw the square box as an "envelope" for the figure. Now, draw the shapes that are "not figure". You can carve away the spaces and be left with the figure. Drawing the negative spaces as shapes will increase your awareness of the relativity of the positive shapes. Proportionality is all in the angles. Big to small... General to specific. Keep your lines light, loose and explorative... 80 percent looking... 20 percent drawing. I hope that's useful.
Jesper Axelsson
Hi @Jack, nice drawings! One answer to your concerns could be: Don't worry about it. The better you get, the better your accuracy will become. But I have some tips that might help: - Step back regularly to see your work from a distance, or if you're in a cramped space, take a photo of your drawing. The point is to see your drawing in a smaller scale, since that can reveal some proportion issues. - Mirror the drawing. You could take your phone for example, and hold one of its edges against your forhead. Then if you look up into the turned off dark screen, you'll see your artwork mirrored and upside down, which can give you a fresh look on things, and help you notice mistakes. - Having a good body position when drawing could help. Sitting upright with your eyes at about an arms length from the paper, allows you to keep the big picture in mind when you draw. But as mentioned, maybe the issue will disappear with practice. For your next drawings, here are some things to consider: - You're making the heads to small. You could double check your work with the Human Proportions – Average Figure. Take the height of the head, then go down the figure you've drawn, one head at a time, and check if things are in the right place. The nipples are one head down, and the belly button another, etc. For foreshortened poses you could think three dimensionally, and imagine stacking the heads in space, to get a hunch of whether the proportions are right or not. - Overall, your drawings are stretched vertically; you're making vertical distances longer than they are. So keep an extra eye on that. As a specific exercise, you could practice cutting vertical distances in half. You might discover that you tend to put the middle point too low, for example. Or to get even more practice. First draw a large rectangle to practice your horizontals and verticals; compare the horizontal lines with the horizontal edges of the paper, and the vertical lines with the vertical edges of the paper (then check with a ruler and make adjustmens). Then split that rectangle in halves, top to bottom, side to side. - When you're doing the lay-in, check your work with horizontals and verticals, to make sure that things are aligning correctly. I hope this helps :)
@hannassi
2yr
Here are some of the drawings i did lately. I prominently indicated the different curves and/or muscles of the body that normally would not have been really noticeable. The reason for that is because i wanted to make it easier for myself if i were ever to shade them. Anyways, critiques are very welcome,)
@hannassi
2yr
Here are some drawings i did. I think they lack gesture, they look a little stiff
Jesper Axelsson
Hi @hannassi, nice drawings! These look carefully measured. Good job! - In #1 her left (our right) arm is too long. Referring to the standardized proportions can be a help (Human Proportions – Average Figure for example). According to those the upper arm should be about the length of the ribcage. Another hint is to look at the other arm. Are both arms the same lenght? The bilateral symmetry of the body is important. - In #2 the torso feels compressed. We're lacking the space between the ribcage and hip. When drawing, think of the figure as a series of shapes. You have the Head neck ribcage waist hip upper legs lower legs feet shoulders upper arms lower arms hands Make sure every shape is there. Having a clear idea of the pieces, can make the process easier and more efficient. I also think it will improve the drawing, since it will make priorities clear; you emphasize the major shapes instead of the secondary or tertiary shapes. In drawing#3 you have a strong prism like shape at the hip which seem to resemble the gluteus medius, but you don't have an indication of the ribcage, which is a primary shape. The gluteus medius is secondary. Emphasizing the secondaries can tear the composition apart. I attached two hand drawings that I did where the secondaries dominate (I'm working on this myself). The hand to the left works a little better than the right, since the secondary shapes dominate less. -In #4 the figure might have been drawn too wide and chubby. I hope this helps :) Keep up the good work!
Andres Torres
I spent about 20 minutes straight trying to get the measuring right and when I started drawing about 5 minutes in I realized it was completely wrong and I spent nearly half an hour wasting my time. How do I do better?
@draft_al
2yr
Hi Dre! Thank you for your courage to come forward and admitting that you are struggling. It can be hard to admit; I know that from experience. What helped me understand the whole measurement thing, especially when it come to the Loomis method was watching Proko's video on how different head shapes fit into Loomis. Loomis is a good reference, but it is not the law. It is a good thing that you caught the mistakes early on. However, take as long as you have to with your drawing, I can relate because you see people like Stan, and his former teacher Jeff get to a point of likeness with such ease. Don't worry, it'll come. You may want to take your drawing to a finish to the best of you ability, and place tracing paper over it to redraw and correct the mistakes you see on your drawing on the tracing. I hope this helps.
Samuel Sanjaya
My measurement exercises. This exercises made me realized that gesture can effect the proportion itself. Or that's what I think, not too sure. I find that drawing figures is like a balancing act between gesture and proportions, too heavy that one side is off, then the drawing will fall apart. I think that's why I need to learn this in order to tip the scale freely, without breaking it. I hope I can get some critiques on this assignment.
Vera
2yr
Hello. Here are some of my measuring practices. In the first drawing, I measured the figure mostly by looking at the shapes and angles. One thing I found difficult was measuring and keeping the correct proportions of the legs. Advice and critiques are appreciated. Reference images are from line-of-action.com.
Dubčido
2yr
Good job, keep it up, practice makes the master.)
Help!
Browse the FAQs or our more detailed Documentation. If you still need help or to contact us for any reason, drop us a line and we’ll get back to you as soon as possible!