
Figure Drawing Fundamentals
Gesture
The Bean
Structure
Landmarks
Robo Bean
Mannequinization
Balance
Exaggeration
Proportions
Measuring
Shading
Figure Drawing Demo


Closing Thoughts


The General Tonal Composition of a full Figure Drawing Demo
Newest


klaibee
1yr
one more study- figure drawing and shading


Lauri Panopoulos
1yr
Beautiful


@morelock
1yr
this is really nice

Gannon Beck
1yr
Beautiful!

faye zhang
1yr
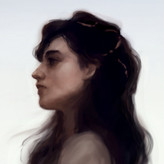
Having myopia is helpful at this stage because I don’t have to squint much to see the general shadow shapes.
I don’t have charcoal powder, so I shaded with graphite pencils and used a kneaded eraser to sculpt some of the lighter areas.
klaibee
1yr
Drawing and shading practice

•
1yr
Nice! It definitely has the illusion of 3D form and is informed by anatomical knowledge.
As for shading, what does seem to happen is that the halftones become dark too quickly, which blends together the areas of light into the shadow and reduces clarity in your drawing. After you place in your separation between light and shadow, try keeping these two areas distinct even as you add in more values, and it always helps to squint at the image to get an idea for the general masses of value. For this piece, my suggestion would be lightening the halftones on the side of the light, and darkening the bounce light within the shadows. I highly recommend watching this video by Dorian Iten that further explains this and helps modify your placement of values: https://www.proko.com/s/3CWA


@henrik17
2yr
Hello people,
just finished my first longer figure drawing. More will be coming soon! Critiques are always welcome.
•
2yr
Nice! Some quick pointers as you continue along in your progress:
- Snowmanning: Careful with symmetry when laying out the connection points in the human figure, e.g. knees and elbows, which can cause the figure to look like a snowman, hence the term. The connection points tend to have an asymmetrical interlocking that lends itself to gesture and flow throughout the figure. I see you're heading that way, but it could be further pronounced and taken into account when rendering the forms, not just at the gesture stage.
- Proportion: Before starting in the final render, it can be helpful to double check how the features of the body compare to one another, or measure how things line-up in the lay-in vs the original reference (e.g. if the fingers align vertically with the foot and knee). Right now, the figure seems to skew a bit larger in the top half than the bottom half, with the hands in particular appearing small. Taking the time to measure and compare within the drawing early on can really make a difference.
- Lighting: It seems your reference has two opposing light sources, so props to you for tackling it. I would recommend something with one direct source in the future, to make things easier to learn from. It would be easier to find and define the core shadow as well, since right now it seems rather soft and somewhat vague. This video by Dorian Iten is also great at explaining shading and it's really helped me out a lot: https://www.proko.com/s/3CWA
I hope this is useful to you and I look forward to seeing your future work :)

@kotka
2yr
I think it's time to move on to details. My favorite stage so far, powdering and smudging out the charcoal dust really made everything come alive. I don't know a lot of detailed anatomy and would like to stop here since I'm scared that I will draw stuff that does not exist during the detail section. Looking forward so much to the anatomy course!


sean azzopardi
2yr
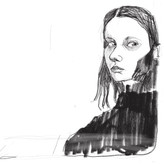
I didn’t have charcoal powder so shaded using a pencil. The drawing is losing subtle tone and is looking fairly chewed up. For the moment I’m going to stop at this stage. Comments are welcome.


Sandra Süsser
3yr
Tried to imitate the traditional general tonal composition with the Graphit powder in my digital drawing.

Matt Haslett
3yr
Ok, so this is the furthest I've ever gotten on a drawing before, but I feel like there is still something missing and I'm not sure what it is. I would love some critiques on the shading of this one. I used 2 pencils (Staetdler HB and 2B), a blending stump and an eraser. I don't have brushes.


•
3yr
Have you done the egg shading exercise yet? I think that would help you out a lot - https://www.proko.com/s/3CWA
I would also check out Stan's 5 common shading mistakes video as that contains a lot of good info on how not to shade a drawing - https://www.proko.com/s/iPEY


@backcountry314
4yr
What are the brush sizes for the filbert and flat brush? Also, does it matter what medium they are made for (watercolor, acrylic, oil, etc.)? Finally, does it matter if they are nice brushes or will a basic/economic level brush be adequate? Thanks!


Jessica Harrison
4yr
Brush sizes will vary depending on the brand. One brush brand's #10 might be another's #14. Generally when buying brushes, I'll do, a #2, #4, #6, etc.. The medium does matter and look at the overall texture of the brush. If it's a soft, sable brush, its one you probably wouldn't want to scrub in a stain in the beginning stages of the painting (this would be better suited with a bristle brush, or one that isn't so absorbent and soft). The brushes that are my favorite have all been a variety price wise. You can start off with a small variety of filberts and flats, and see which ones you like! Ultimately its going to be up to your personal preference.


Margaret Langston
4yr

Course by Patrick Jones
Give a gift
Give a gift card for art students to use on anything in the Proko store.
Or gift this course:

About instructor
Founder of Proko, artist and teacher of drawing, painting, and anatomy. I try to make my lessons fun and ultra packed with information.