How to Draw the Calf - Anatomy for Artists
149K views
lesson video
How to Draw the Calf - Anatomy for Artists
courseAnatomy of the Human BodySelected 3 parts (371 lessons)
-27%
$347.25
$477
You save $129.75
assignments 25 submissions
Richard Barkman
Hey all, please critique my calf assignment. Having just looked at Stan’s work again, I see I could have spent more time on line and shape design (straights vs curves, assymetry, etc). Thanks
LESSON NOTES

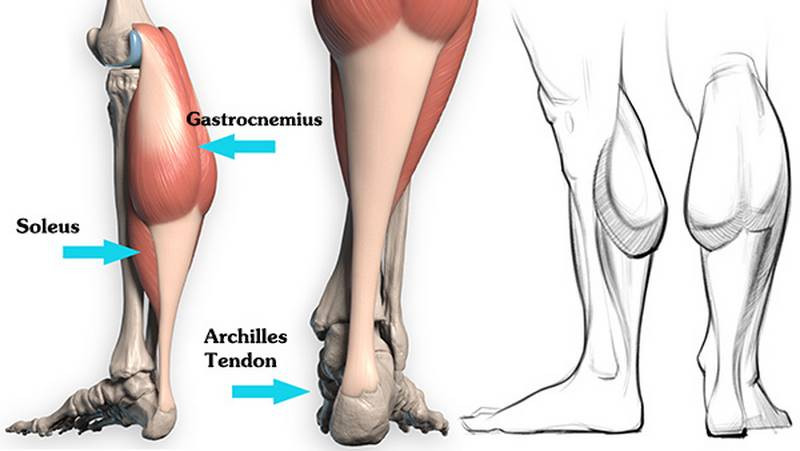
Drawing Calf Muscles

Today we’re learning to draw calves! So, the calf has two muscles, but only one insertion tendon. Probably the most famous tendon of all tendons: the Achilles tendon. The Achilles tendon attaches gastrocnemius and soleus to the block of the heel. When the calf contracts, the Achilles tendon pulls up on the heel to straighten the ankle. So soleus and gastrocnemius point your toes... which means the strongest calves belong to the ballerinas. Maybe? I dunno...

Let’s get right to the heart and soul of the matter: the soleus.

Soleus

“Soleus” comes from Latin for a type of flat sandal, which is a pretty accurate description of this muscle’s form. We’ve seen “mattress” muscles like this before: brachialis in the arm, vastus intermedius in the quads. We kind of blew off vastus intermedius because it’s almost completely hidden. But the soleus is very much visible on the surface. It can be seen independent of gastrocnemius even on thin figures. It clearly pokes out from underneath the edges of gastrocnemius, especially at the ankle where the soleus muscle belly descends lower and is wider than gastrocnemius. Soleus can even be seen in front view, behind the tibia. And gastrocnemius is behind soleus. Kind of like stairsteps.

soleus

Soleus exists entirely below the knee, originating from the tibia and fibula. It’s important to notice how slanted soleus is: high on the outside, low on the inside. Gastrocnemius has this same slant. If we zoom way out, this angle fits the pattern of alternating apexes throughout the leg: the zig zag of asymmetry. These are rhythms we seek to exaggerate when we want to draw dynamic anatomy.

soleus 2

Roughly 2/3 down the leg, soleus begins to narrow and interlace with the Achilles tendon. It leaves a gap as it passes behind the ankles, at least one finger in width.

Gastrocnemius

Now for the superficial superstar: gastrocnemius. As important as soleus is, Mt Gastroc is more of a focal point. It’s probably the muscle you think of when you think of the calf.

The hamstring tendons create this tunnel for the gastrocnemius to squeeze into. This top region is normally hidden by a fat pad, but it’s good to know the origin anyway. Gastrocnemius originates above the knee, on the top of the femoral condyles, and it has two heads, one from each condyle. These heads tend to soften together to create a round bump. This is where the name gastrocnemius comes from: it’s “gastroc,” as in stomach, because anatomists are throwing shade and saying that the calf looks like a big round pot belly. Anyway, it really is two separate heads, and they split when the calf tenses.

gastrocnemius1

These heads are not symmetrical: the lateral head ends higher and tends to create an oblique edge that flows into the Soleus. The medial head is bigger and rounder. You’ll usually see it take a sharper turn inward to attach to the Achilles tendon. In essence, the lateral head makes a slash and the medial head makes a hook. Together they kinda make an upside down heart...

The gastrocnemius is most interesting where muscle meets tendon, about halfway down the lower leg. If you’re idealizing the design, you can make the muscle longer on a female to get that sleek feminine look that artist’s often go for. And a little shorter on a male, if you’re shooting to make your model look more masculine and accent their muscularity. There’s a lot of variation in that proportion between individuals, and of course, when gastrocnemius contracts, the belly shortens so, if someone’s wearing high heels or reaching for something up high, the muscle belly will shorten.

calve examples

Remember that slant: the Achilles tendon doesn’t come in like this, but at an angle. Like vastus medialis in the quads, the medial gastrocnemius head is low and heavy, and creates a round form where it meets the Achilles tendon.

Now for the calf muscle’s final form … the Achilles tendon! Despite the legends about its fragility, the Achilles tendon is actually the thickest and strongest tendon in the human body. It wraps around the lower third of the calf and funnels muscle tissue from soleus and gastrocnemius into a thick cable that anchors down on the heel bone. This creates a V shape. The narrowest point of the tendon is about 3 fingers’ width above the heel.

calf overview

So let’s review. From inside profile, we can see how gastrocnemius is big and round, while the soleus is wide and flat. The gastrocnemius meets the Achilles tendon at around the halfway mark. If we smooth things over, the calf looks like an upside down bowling pin...or a chicken drumstick... or a caveman’s club! Except it’s slanted, high on the outside, low and heavy on the inside. When the leg tenses, it splits into three forms. The two heads of the gastrocnemius and the soleus flowing down into the Achilles tendon. And that’s what you need to know to draw the calf. Except of course all the stuff I left out of this video. That stuff will be in the premium video. In premium we’ll analyze the forms in more detail and expand on the anatomical info. And as always, you’ll get assignment demonstrations, 3d models and an ebook.

Of course, there’s only one way to really master anatomy. Get that pencil sharpened and let’s get started on your assignment.

DOWNLOADS
zip
Calves-Assignment-Images.zip
1 MB
txt
Calf_muscles_premium_transcript.txt
5 kB
mp4
How to Draw Calf Muscles PREMIUM_1080p.mp4
124 MB
ASSIGNMENTS

Assignment

Your assignment is to do tonal studies of the calves from the photos provided in the description below. Start with a linear layin making sure you’re tracking everything where it should go, and then add clean tone on top to study the planar structure of the calves. Make sure to post your assignment to the community at proko.com/groups if you want to be featured in the critique video. Alright thank you guys for watching. Leave a comment below if you have any questions about the calves.

Newest
Kianna Peppers
I accidentally missed the assignment focusing on shading this round, so here are my Calf studies. - - - All previous and current assignments are available on my IG (@crystalk25) & FB page here. Critiques are always welcome, thank you! https://www.facebook.com/saved/?list_id=4730838993696368&referrer=SAVE_DASHBOARD_NAVIGATION_PANEL
Kassjan (Kass) Smyczek
I am in a different country so I can‘t use my scanner. But i tried to take a good picture: Here is my calf assignment.
Alejandro
10mo
Ezra
1yr
A good challenge, had so much difficulty on the last one
Ash Chung
2yr
Have yet to learn to see in value, shade, and how to not get anal about every miniscule detail
@syodraws
1yr
You did pretty well on designing the shapes of the muscles, and on separating dark from light. Thus, the forms read clearly on your drawings. As a general critique, be careful about making the halftones too dark compared to the shadows (on the fourth drawing of the leg from the front, the plane from the tibia to the medial calf head is a little too dark, as are the regions in the quadriceps that are near the shadows). Overall, Good job :)
Patrick Bosworth
These are excellent, really beautiful work!
Samuel Sanjaya
My attempt at calf muscles
Lenserd martell
@viny
3yr
@younchen
3yr
Here are my assignments. any critiques appreciate .
Jesper Axelsson
Hi @younchen, nice studies! The anatomy, shading and forms look pretty good! And nice shape design. - Try to be more aware of space. Before you start drawing, figure out which part of the body is closest to the viewer, and which one is furthest. In your 2nd drawing for example, I don't really feel that the left leg is diving into space. It feels a bit like everything in the drawing is on the same picture plane. Having a clear understanding of how things are oriented in space, allows you to communicate depth clearly. Use the tools at your disposal to communicate depth (size, placement, shape, soft/hard edges, wrapping the shading around the forms, directional hatching, value, etc.). -The underlying drawing isn't very strong. The overall shape of the leg doesn't correspond well to the reference (you tend to make it too straight), and the proportions are a bit off (you tend to elongate the leg). I think you would benefit from doing some drawings where you break down the leg into very simple shapes, and try to design them with gesture. Kinda similar to what you might see @Mike Mattesi doing. As a complement to your anatomy studies I would highly recommend practicing some timed figure drawing, where you get to focus on the figure as a whole. I think you would benefit from mimicking Glenn Vilppu's work. I like his approach of starting with a flow, then containing it with forms. He explains this at 21:00 in this Drawing Demo by Glenn Vilppu. If you do some figure drawings, feel free to tag me (@Jesper Axelsson), if you want some feedback :) Hope this helps :) Keep up the good work!
Phattara Groodpan
Samuel Parker
Calf shading exercises.
@lahetkan
3yr
Hello, here's my assignments.
Richard Barkman
Hey all, please critique my calf assignment. Having just looked at Stan’s work again, I see I could have spent more time on line and shape design (straights vs curves, assymetry, etc). Thanks
Mike Karcz
3yr
I think these look great! If I could offer any critiques - mostly a personal taste - I think some harder edges in the shading of the quad(?) - the first image where the guy is squatting.
@abrahan13
3yr
any feedback is appreciated
Jesper Axelsson
Nice! - I would keep an extra eye out for proportions. I think you would appreciate this video Measuring Techniques. Starting with an envelope, to make sure the big picture is working, will really help I think. - Try to give the drawings more gesture. Just like with the envelope mentioned above, this could be something you do in your lay-in, before thinking about the anatomical detail. Start by drawing the legs, just thinking about creating shapes that have good gesture, then add the anatomical details on top. You might appreciate this video How Asymmetry and Anatomy Go Hand in Hand. - Before shading details, first think of the shading of the primary forms ( How to Shade a Drawing at 0:45 ) At the moment, the primary forms don't ready very clearly. - To show the roundness of the forms, soften the edges where the form turns; either by using a softer brush, or by adding a transitional value. - When I did my shading paintover I noticed that what looked like shadow in your drawings was actually light halftones. Was it supposed to be light halftone? Try making it lighter so that it looks like being part of the lights. I think you used the value of the dark halftones. Hope this helps :) Keep up the good work!
James Paris
This is my assignment, I didn't do all the studies with Tone, I figured I wasn't so good and that it was damaging the undestanding/readability ! But ! I will soon train myself in tone/shading, because this is a real struggle for me
Alexis Riviere
Tried my luck with calves before going further with the videos. Not sure about the anatomy I decided to exaggerate, since the forms are really blending into each other on the references sometimes. The one leg seen from the front got me especially puzzled about how much of the calves are actually showing.
Thieum
3yr
Hello everyone! My calf muscles assignment.
Thieum
3yr
Thank you very much Steve! And thank you also for all the advice and explanations you give on the forum. Always very clear and informative! I love it, and your work too!
Steve Lenze
Your drawings are really nice :)
Marco Sordi
Solid, concrete and clean. Very professional. Excellent shading. Fantastic.
Sadie Ward
3yr
Here is my go at the assessment. Shading is something very new to me but I didn't want to skip this one just because that isn't something I was good at yet. Would really love some critique as I was pushed out of my comfort zone with this (which I liked).
Steve Lenze
Hey Sadie, I like your drawings, I think you captured the gesture and the anatomy pretty well. You mentioned that you were not good at rendering yet, so I thought I would show you a few things that I think will get you started. First of all, rendering is meant to give volume and show form. The easiest way to begin is to start with the core shadow that runs along the length of the form. Then softly transition into the light side with half tones, and into the shadows with dark half tones. Notice that each form gets a core shadow and half tones I did some sketches over your drawings to show you what I mean. I hope it's clear and you understand what I am showing you :)
Account deleted
@hiflow
3yr
Thieum
3yr
Good job ! Nice shape design and shadow mapping !
Help!
Browse the FAQs or our more detailed Documentation. If you still need help or to contact us for any reason, drop us a line and we’ll get back to you as soon as possible!