How to Shade a Drawing
This lesson has a premium version with extra content. Get it now!
3.3M views
lesson video
How to Shade a Drawing
courseFigure Drawing FundamentalsFull course (57 lessons)
-20%
$120
$150
You save $30
assignments 60 submissions
@tomasb
First completed figure drawing on this course. Charcoal, white chalk and toned paper (fairly coarse grained). Any critique and comments appreciated!
LESSON NOTES

Form

First let’s talk about form, because form is what we are trying to indicate when we shade.

In order to effectively shade form, you first need to understand the form you’re shading. In the Structure video I talked about the basic building blocks of form – spheres, cylinders and boxes.
cylinders cubes spheres forms

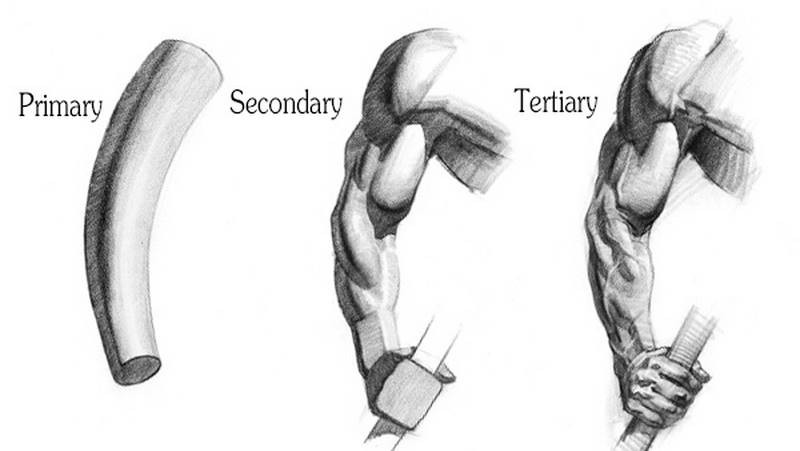
Organic forms found in nature, like humans, animals and trees could and should be constructed from these simple forms to capture the character of the subject. The primary form, such as a cylinder for an arm, should be dominant over any secondary forms, such as the biceps, triceps, deltoid, forearms muscles. And these secondary forms should be dominant over tertiary forms, like a vein or wrinkles.

You don’t necessarily have to draw them in that sequence, just make sure that your shading primarily reveals the largest forms, and the smaller forms act as details - icing on the cake.

peimary secondary tertiary forms of the arm

Planes

Planes can be thought of as flat tiles, arranged in 3d space to create a form. For example, a sphere has a front plane, top plane, side planes, and many more between that together resemble a sphere. They create the illusion of form. Though really a sphere is rounded, without any flat planes, thinking of it in this way will help to imagine the sphere as a 3d object and aid in the shading process. You can think of each section and imagine which direction that plane faces. Then compare it to the direction of the light source. The plane facing the light is the lightest and progressively get darker as they turn away.

This gradation of tone on the planes gives a sense of light on the form and helps to show the 3-dimensionality of the sphere.
planes of the sphere

If you want to round out the edges to indicate a softer form, then soften the edge between these planes!Though sometimes leaving the edges between the planes hard even on what looks like a rounded form can help to illustrate the structure more effectively. Consider the 3-dimensional form rather than just blurring edges for techniques' sake.

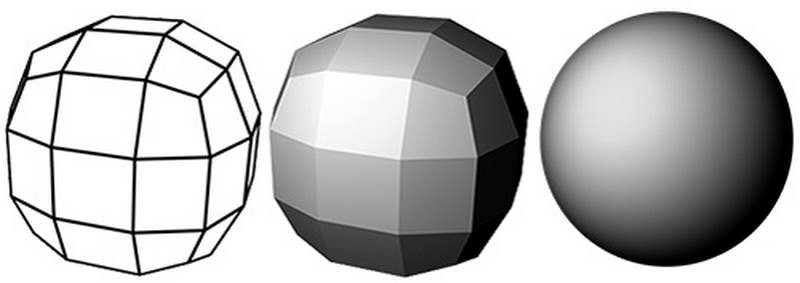
I also want to point out that when you’re simplifying a form, what you’re doing is decreasing the number of planes which that form consists of. This 3d model consists of millions of planes, 3d artists call them polygons. When we lower the polygons down to a few thousand, we get something like this.

planes of the body 3d model

Much more manageable for our brains to process. This is the level I'm usually thinking at when I’m observing the planes on an organic form like a figure. Shade these planes with soft edges and it gives the illusion of millions of planes. But in my mind, I’m only thinking of a few major planes for a given area.

If you lower the polycount even further, basically what you have is the Robo Bean and the Mannequin. It’s good to imagine each form as a block and identify each minor plane as either being part of the top, bottom, front, back or side planes. The simple planes of a block are the most important ones.

“Avoid all elaborate and unnecessary tones which take away from a plane appearing to be on one of 4 major sides.” - George Bridgman

Light on Form

When an object is lit by a direct light source, you will get a very predictable pattern of lights and shadows. We can make a form feel 3d by indicating all the parts of the lights and shadows correctly.

light on form shading diagram

Let’s do a little example. An elongated rounded form with some thinner cylindrical ends. This can be a generic muscle, similar to a bicep. You have the rounded belly of the muscle with tendons on both ends.

First determine the angle of the light source. Let’s say top right.. And imagine the planes that make up this form. All the planes that face the light will belong to the light family. All the planes that face away from the light will belong to the shadow family.
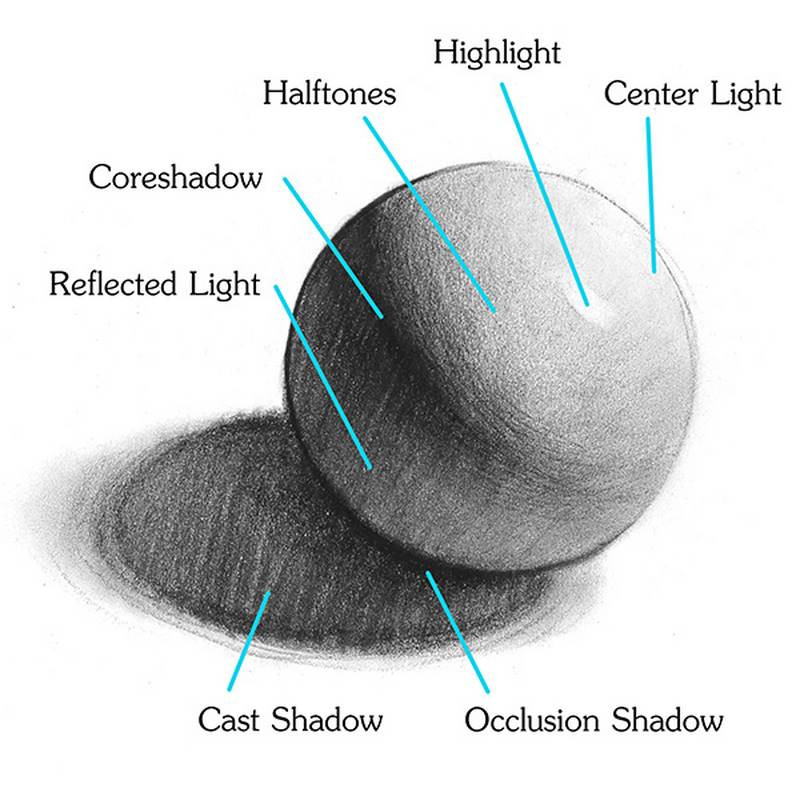
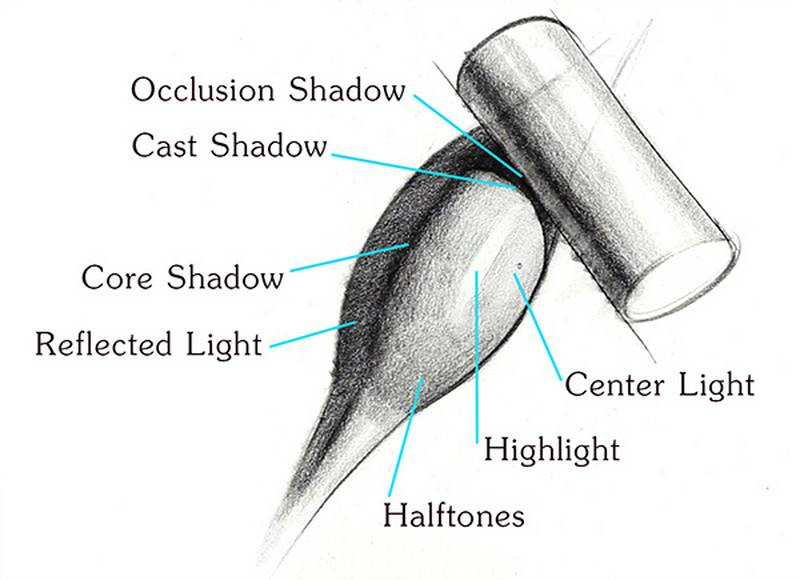
Core Shadow

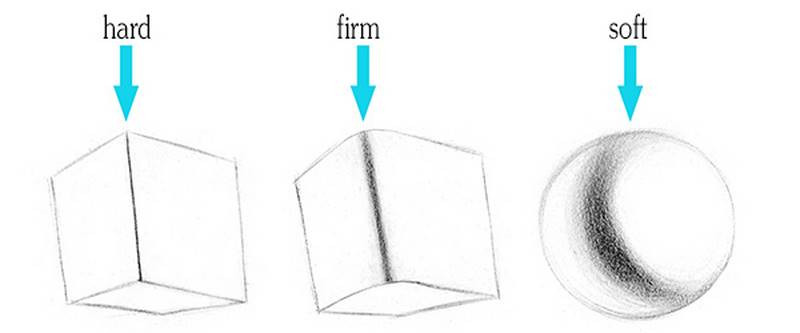
As a divider of the two families, you’ll usually see a core shadow - a darker strip at the edge of the shadow. This core shadow shouldn't be the same all the way the down the form. In the rounded belly part of the form, the core shadow will be thicker with a softer edge. As the form transitions to the thinner tendon, the core shadow will also get thinner with a sharper edge. Make sure you pay attention to what you’re indicating with the core shadow. Avoid drawing racing stripes down the form. This usually happens when people think in 2-dimensions and don't consider the 3-dimensional form they're indicating. Is it cylindrical, cuboid, or somewhere between the two? Draw a soft, firm or hard edge accordingly.

soft firm hard core shadows

Reflected Light

Fill in the shadow side with a clean dark value, but lighter than the core shadow. This is called the reflected light. It’s lighter because of bounce light and reflections from the environment illuminating this area. I always start with a flat value first, even if I see variations of value caused by plane changes inside the shadows. The most important part is to separate the shadow family from the light family.

Later in the drawing, we can work on the plane changes within the shadows if they are really important. Though in this example there aren't really any plane changes, just a soft gradation to show the rounded form. On a complex form like a figure, it’s usually a good idea to keep the details within the shadows quieter than the details in the lights. Most of the story is going to be told in the lit areas.

Naturally, the viewer will look into the areas where the light shines, so you want to put the interesting detail work there, and keep the shadows as the areas of rest.
This drawing by Steve Huston is a really good example of this principle. He kept the shading on the bottom of the feet so simple that he completely lost it into the background. Same thing with the hair.
reflected light figure drawing steve huston

Centerlight and Halftones

Next, identify the point of the center light. This is the point where the plane faces directly to the light. The halftones appear as a gradation darkest near the core shadow and lightest at the center light. So, I’m thinking about how these planes get lighter as they wrap around toward the centerlight. Then down here, the planes start to turn downward, also getting darker. Once we get to the cylinder of the tendon, the planes turn back to face forward.

Highlight

The highlight is different from the center light, but sometimes appearing to fall very close to the center light. Remember, the center light is the plane that faces the light and the highlight is the plane that reflects the lights relative to the position of the viewer.

A simple way to remember the interaction between the center light and highlight is - When the shadow is thin the highlight will be very close to the center light. When the shadow is large, then highlight will be farther from the centerlight, moving closer to the shadow.

So, I’ve established the shape of the highlight and gave it a sharp edge on the side and softer toward the top and bottom.

Cast Shadow and Occlusion Shadow

So far we have a center light, highlight, halftone, core shadow, and reflected light. There’s two more that we’re missing. These elements occur when there’s an interaction between two forms. So let’s introduce a random cylinder into the scene. This cylinder blocks light from hitting the surface of the muscle right here. That’s called a cast shadow because it’s cast by the cylinder. When I draw the cast shadow shape, I use it to describe the shape of the object it is casting on to, not the object it is casting from.

The area deep under the cylinder will get less bounce light and so it will be darker. That’s an occlusion shadow. Keep the edge at the cylinder sharp and the edge going away very soft.

So, those are all the parts. Review all these elements and practice spotting them on directly lit objects.

interaction between two forms cast shadow diagram

There are 2 other things that I look for that could affect the value of the form.

Local Value

The local value of the object itself shifts the value range. These 2 eggs are light exactly the same way, but you can see how the value range is different. On the white egg the range from darkest core to center light is pretty wide. On the brown egg the values get compressed and pushed darker

local value range of two egs

Interestingly, the highlight isn’t affected as much. It still gets darker, but not as much as the other parts. Because of that, the highlight on the brown egg appears very bright. The value of the highlight depends on the reflectivity of the material. A glossy surface will have brighter highlights, whereas a highlight on a matte surface might not be visible at all. The effects you see on these eggs are really close to what you’d see with skin.

Intensity of Light

The intensity of the light also makes a big difference. Intense light will create more contrast between the lights and shadows. Dim light, low contrast. The intensity of the light can shift within the same object. For example in this figure drawing, the light source is above the figure, so the light is intense at the top and drops off toward the bottom as the forms get farther from the light source. And this is actually something you can cheat. You don’t have to see this on the model in order to do it. You can use it as a compositional trick to guide the viewer’s eye to the focal point. In this case I’m guiding the eye to the upper back, which has the interesting light and dark design pattern of the anatomy. Here's another drawing by Steve Huston, which illustrates this very well.
intensity of light figure drawing steve huston

Detailed explanation of the process

Available in the premium course, I describe my complete process of drawing a figure, step by step with narration. I also include the 5-value rule – allowing yourself only 5 values to shade with.

If you liked this lesson, be sure to check out the next lesson on the Figure Drawing Timelapse of Yoni.

Subscribe to the Proko Newsletter so you don’t miss any new videos.

DOWNLOADS
jpeg
YoniPhoto-1.jpg
3 MB
txt
how-to-shade-a-drawing-premium-transcript.txt
17 kB
mp4
how_to_shade_a_drawing_premium_720p.mp4
179 MB
ASSIGNMENTS

Use the photo of Yoni or choose another pose from my pose sets to draw a fully shaded figure. I recommend drawing large so that you have room to shade some details. In my example, I’ll be drawing on an 18×24 inch paper. Also, don’t rush it. A student in most ateliers will spend at least 3 hours on a figure drawing. Personally, I recommend longer, especially if this is one of your first long figure drawings.

Newest
Amortquio Flores
Had a hard time doing this, I need some tips on how to do better shading.
@eren666
1mo
I think the main thing your are missing is simply a better definition of the plane changes. The back for example, looks very uniform so there's no indication of muscles and such
Richard W
2mo
I choose another model (from line of action). At first, I was pretty happy with the result. Then I realizd my measuring is not ok, one again (The torso is too short, the waist too thin...) and definitely lack of contrast (more on the scan than on the original drawing). But there is hope. It's better than few weeks ago!
Rachel Dawn Owens
Here’s a fairly quick fix I see. Your drawing looks really good. It wouldn’t take much to level it up.
Drew Froehlich
still need some practice doing face proportions, but decided to give it a go with the col-erase
Jocelynn Darlene
At the end of this journey I'm quite proud of how the final pieces turned out, although I could certainly use more practice and will continue to do so! I've learned more than I could have ever imagined, thank you Stan for creating a course that was fun to follow and easy to grasp. I am so appreciative! I cant wait to start another.
Lauri Panopoulos
Beautiful work, Jocelynn!
May Berry
1yr
Practiced this for 10 days. I found a reference photo with a higher contrast. I overlayed the construction drawing with tracing paper and made 2 versions of the same reference photo: 1 black and white, and the other blurred. I still struggle with seeing value and applying it to the drawing. I might need to do some practice from the beginner course.
Rachel Dawn Owens
I think you’re on the right track. It’s really nice how you simplified and contained the shapes of value. The proportions look great too. Below is a demo on how I might break down the shading from this reference- If I was using graphite or charcoal, my final drawing would have maybe came out more organic looking. Processing the drawing this way made it come out rather stiff, but I wanted to make the ideas clear. Learning to draw means learning about how light works. It can seem complicated at first, but it all makes sense if you think about it. Light shines down on the subject and then bounces all over the forms and then back towards the viewer. Drawing is all about creating the illusion of 3d forms on a 2d surface. Understanding value is a big part of that and it looks like you’re getting it. Great study! Keep it up 👍
Joseph Cicero
Hey Guys, me again ;). I've been focusing heavily on mannequins lately, trying to incorporate gesture and mannequins more succinctly. But I thought I'd keep practicing my rendering as well. This was another long one. I took a chance with the composition (as I haven't started studying that) and I'm happy with it overall. This one was a challenge because of the multiple light sources and the subject being very muscular so lots of shading ball type forms. As always critiques are welcome!
Joseph Cicero
I posted this on the Digital Painting Fundamentals class but I wanted to post it here as well. This is another study trying to improve my blending, edge control, and add more details. As always critiques are welcome!
Rachel Dawn Owens
This is great! You got the proportions perfect and the anatomy looks nice. If you want to take this to the next level and emphasize the top of the figure, you could darken the lower torso and legs. I added a soft gradient across the figure to create a focal area around the head and chest. I like your painting. I hope this helps. Keep it up!
Joseph Cicero
A couple more studies, I'm trying to get better with blending values and edge control to show structure or soft areas. If anyone has brush recommendations for Clip Studio for shading, I'm all ears! I also attempted drawing a figure completely from imagination. I'm happy enough with it but that's certainly where knowing some more anatomy will help. Any critiques welcome!
John James
1yr
I think your observation is false in the picture 2. The light by far is not as bride on the belly and leg than on the booba and face. head and upper chest is clearly like spotlide so you have to tone everything else down. if you have more question follow my youtube channel bendergpt i do mostly inking and or drawings. Dont forget spotlights cast hard shadows so you can really clear edge then and everything outside it you can make it soft it will make a great composition if you even like exaggorate it.
Melanie Scearce
I think your shading is looking good. I can't speak on Clip Studio, but I did want to point out that the extended leg on your figure from imagination looks like it's backwards. The shape you used for the knee looks like shorthand for the back of the knee (popliteal fossa), and the bulge of the calf is higher on the left side of her leg opposed to the right. Nice work overall, it's so difficult to draw a figure from imagination!
Michael
1yr
After a very long time, here are my shaded figures - both in charcoal on newsprint. I followed along with Stan drawing Yoni, and definitely understood the process by the time I was doing my own attempt. However I often jumped from shadow mapping to details and vice versa. I would say that my own attempt took me 10+ hours to finish with much of that spent measuring (my arm was sore for days from holding up the pencil...). One thing I found was that the charcoal powder I used didn't seem to go very dark at all, darkest being the lower half of the figure. My linework and pencil holding technique need work - lines often didn't turn out the way I wanted them to. When doing my own attempt I realised (perhaps too late) that you really don't need much to indicate something, Stan does mention this in one of the lessons but I think it can go much further. I looked into Lane Brown's work with much softer edges and tone, and I think that gave me the will to finish the drawing. I'll go into Stan's portrait course next before the anatomy course, but I want to pump out as many figures as I can! I'm not sure I'll do another fully rendered figure for a long time though (quantity over quality)... Thanks to all the instructors including @Rachel Dawn Owens, @Jesper Axelsson and @Melanie Scearce for your feedback!
Rachel Dawn Owens
This. Is. Incredible. These are awesome drawings! Moving too quickly into detail is perfectly ok. All you need is more mileage. You’re right that you should strive for quantity of drawings to get better. You learn the most in the first hour of a drawing. Learning to sit on a drawing for 10+ hours is also a valuable skill. Think of it like your max lift if you were a weightlifter. Its good to know how far you can go with a drawing and it looks like you can go very far. This is great, I love how you rendered these. Heres a demo of about how I go about it. It’s like I’m bringing the drawing into focus. I start light and fuzzy and sharpen the focus as I go, waiting for the end to add the darkest marks. Good luck and keep going 👍
Joseph Cicero
First attempt at a 5 value shading. Overall, I'm happy with how it turned out but those dark and light halftones were very difficult to separate at times. Critiques are always welcome.
Giorgi Karkuzashvili
The key is to repeat it weekly(daily)
@maximilienle2d
Hi, I tried doing the Yoni drawing. I didn't have any newsprint or smooth paper so I did it on normal 90 gsm and with a stump since I did not have charcoal powder. It was a good experience and I want to try again to do something in charcoal with my own style but I will wait to buy better materials for that (to get those smooth details, the clean background and the archival properties).
Joseph Cicero
A few more shadow studies. Critiques always welcome!
maciek szczech
Unique and I ❤️ these studies.
Joseph Cicero
Hey Everyone, I've been working a little through Dorian's shading course and here are a couple of my attempts at the "notan" version of shading. I'm not quite ready for full rendering so I'm just working on separating lights and darks. I know there some instances of reflected light that I chose to not shade, some of that was because I thought it looked better and some is I wasn't sure where the light source was coming from. Any critique is always welcome!
Emma X
1yr
My second attempt at shading in a figure drawing, I don't think it's as good as my first, feels flatter and the lines aren't as clear, it's kinda "muddy"? Any advice appreciated! I'll include my early line art and the reference photo.
Emma X
1yr
First time trying to shade in a figure drawing with pencil! It's way harder than it looks xD Would love any and all feedback!
@amaka45
1yr
Hey Emma, nice job for being your first time. I would recommend checking out the shading assignments here on Proko of shading an egg and a pear. You do not necessarily have to pay for the full course if you are a starving artist like most of us, lol! Try starting with a simple shape with a singular light source. I would give more advice, but I too am just now learning to add tone to my drawings. Hope this helps!   https://www.youtube.com/watch?v=6vapw6n6FyU&list=PLnSiPyMK9PTyRitLtaj6JIbRF5LttP6Mz&index=132   https://www.proko.com/course-lesson/the-perfect-egg/assignments
Sofi
2yr
Shaded figure drawing! Critiques welcome.
Account deleted
Jan 17, 2024 Shading the figure. Separating the light and the dark tones.
Kiyoshi Inoue
I realized my proportions were wrong over half way through my drawing, but any tips about my shading would be appreciated.
Samuel Sanjaya
My full figure drawing, I don't know much about anatomy yet, so I tried my best to look at the forms. Any feedback/ critiques will be greatly appreciated.
Martha Muniz
Hi Samuel! Continue practicing gesture and pushing the motion of the figure, even when doing more rendered work, as it helps you get more accurate or informed drawings. As you start shading while learning anatomy, keep going back to observing what you see: break down the image into light and dark groups at the start. There will be changes of value within the shadows, but they will still be darker than areas in the light. I drew out some notes for you I hope are helpful.
Help!
Browse the FAQs or our more detailed Documentation. If you still need help or to contact us for any reason, drop us a line and we’ll get back to you as soon as possible!