Get the Premium version of this video – I go into more depth and talk about other gesture related concepts.
This is the first tutorial of the figure drawing series. And it’s probably one of the most important. In this lesson I’ll be covering “gesture”!
So what exactly is gesture anyway?
Gesture, rhythm, motion, action, flow – these are all words that are used interchangeably and they basically mean the same thing.
They all refer to the movement between things. It’s not the contour, or the form, or the tone. It’s the movement that connects the contours, the forms and the tones.
For example if you have 3 balls, the gesture here would be a C curve that describes the relationship of these balls. This would be the contour, but this is the gesture.
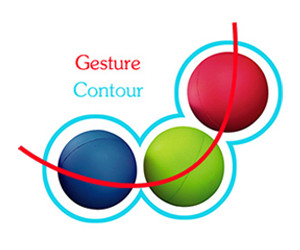
It’s simple to understand, but difficult to put into practice when you’re actually drawing a human figure. We’re so tempted to draw the details of the anatomy and all the little bumps of the contour because we think that detail will make our drawing look better.
But the reality the detail is nothing without the gesture You might accidentally find some gesture while you’re copying the contours, but I don’t like to rely on accidents.
A better approach would be to practice finding the gesture of the figure so many times that it becomes second nature. Quicksketch is a common exercise in art school that involves drawing the model from life within a few minutes.
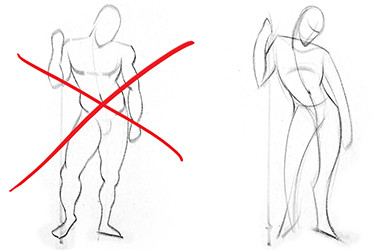
A typical quicksketch session lasts 2-3 hours with poses ranging from 30 seconds to 10 minutes per pose. Gesture is the primary concern. Doing this exercise will train you to see the gesture immediately. You can feel it. Then you will be able to design the details to complement the gesture instead of copying details randomly.
Your journey of mastering quicksketch will be a long but exciting one. There’s a lot to learn and every time you learn something new your sketches will show improvement. During a normal session you’ll finish anywhere from 25 to 100 drawings. Think about that… You’re drawing the human figure up to 100 times within a few hours. If you do this on a regular basis, you’re going to get better. The best thing about it, is it’s actually fun, if you don’t stress over it. In this lesson I’ll go over all concepts you need to know for a successful quicksketch drawing that focuses completely on gesture. In the next lessons I’ll build on to that and introduce additional concepts all of which come together. And in the end, with enough practice you can use all these concepts to produce a completed quicksketch drawing in 5-10 minutes.
So basically gesture is in everything around us. It’s an approach to drawing that you can use to draw anything. Use gesture to tell a story by capturing the body language.
We use our whole body, not just words to communicate ideas and emotions. This is what the gesture should capture. What is the person doing? What is he feeling? What did he just do? Or what is he going to do? This can be told through just a few lines, which the viewer will recognize as the body and can identify the emotions that person is feeling just like we can intuitively identify emotions of the people around us.
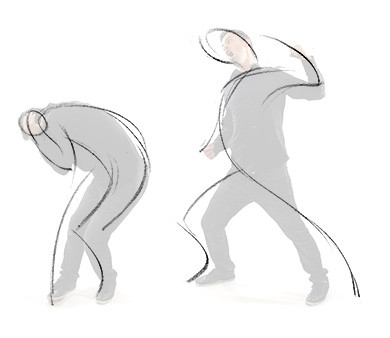
It’s a good idea to exaggerate the pose to tell a better story.
As you become more skilled in exaggerating, you will also improve in capturing the subtleties.
Don’t think of it as a stick figure. Because that could make your drawing stiff. They’re not sticks. They’re not straight lines. They’re Action Lines. Observe the pose and analyze the movement. It’s more about how it feels, rather than how it looks.
Later, we will [add more structure] to these drawings to make the figures feel more solid and real. So, for those of you who don’t find this inspiring and are thinking “I don’t want my people to look like spaghetti” remember that this is not meant to be a finished drawing. It’s an exercise to practice a concept.
You are training your mind to see rhythm in everything you draw. You’re training your mind to consider more than just the contours when you’re drawing shapes. It’s an important concept that needs to be intuitive.
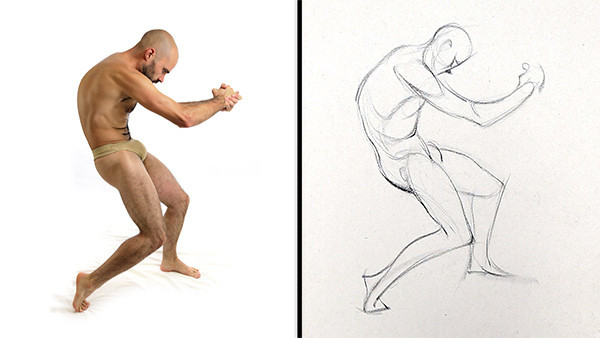
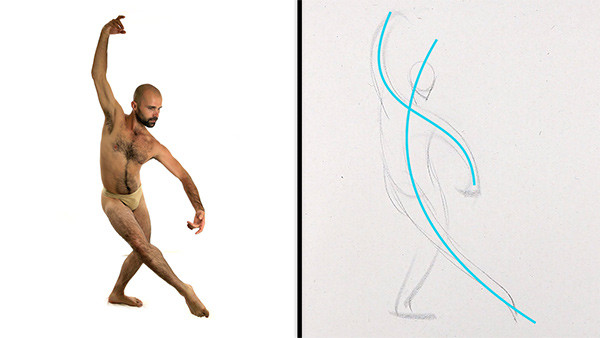
In the drawing above that you’re seeing now the element of gesture was applied to the anatomy to make the figure dynamic.
Let’s go over some important concepts to remember while practicing your gesture drawings.
Longest axis
When you look at a form and try to find the gesture, look at its longest axis. Going down the length of the torso, down the length of the leg, down the length of the arm. It’s in the longest axis of each form where you’ll find the fluid motion from one form to the next.
C-S-I
To eliminate the unnecessary information in the contours and to capture that gesture the lines you use should be simple. Don’t use anything more complicated than a C curve, S curve, or straight. You can use combinations of these curves as you move down the figure, but attempt to do it in as few lines as possible using the simplest lines, C, S, or I.
Line of Action
The gesture should be drawn with as few lines as possible necessary to capture the idea.
Start by finding the longest action line of the body. Try to find a curve that could connect the head to the toes. Not all poses can be efficiently described with one long line that connect the head to the toes, but there is always one main line that shows the directional flow of the pose. This is called the “Line of Action”.
In this pose the line of action would be a C curve showing the major flow from the torso to the legs. But this doesn't tell the whole story, so this pose would need to be broken up into more parts.
I think this sharp turn in the hips is important, so describing it with a soft curve isn’t right. In this case, I would use a combination of a C curve for the torso, and S curves for the legs.
Relaxed and tense curves
The “bendiness” of the curve you use changes how the gesture feels. A longer, fluid curve feels relaxed and moves the eye quickly through that flow. As you start to bend the curve more, you show more energy and more tension in the gesture. Eventually, when it’s bent far enough you can use a zig zag. A zig zag indicates tension, sharp corners, very sudden changes in the movement.
Nature presents this very well with water. When the water is calm the waves flow in an S curve rhythm. During a storm, when there’s more energy in the water, the waves flow in a zig zag pattern.
So, when you want to create tension, think zig zag. When you want to show something is relaxed, use a flowing curve.
Asymmetry of the body
Consider the asymmetrical aspect of the body from the side. The forms alternate in angle from head, ribcage, pelvis, upper leg and lower leg.
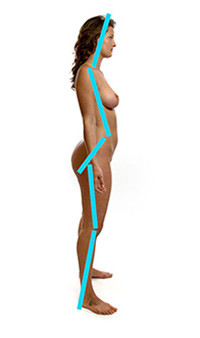
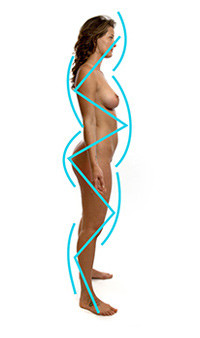
This causes alternating C curves that lead the eye through the body. Like a river flowing through a stream...
The tendency for us is to make things symmetrical, but this stiffens the gesture and makes the figure look like a snowman.
In the next lesson, I’ll show some examples of gesture quick sketches and guide you step by step through the process. But, I suggest you attempt to practice these concepts on your own before watching the step by step video. You’ll have an idea of what it’s like and will be able to pull more information from it because you know what to look for. You’ll have questions you can focus on, and you can compare what you did with what I do. If you need reference photos, I have some pose file sets you can get in the proko store.


