How to Hold and Control Your Pencil
This lesson has a premium version with extra content. Get it now!
3.6M views
lesson video
How to Hold and Control Your Pencil
courseFigure Drawing FundamentalsFull course (57 lessons)
-20%
$120
$150
You save $30
assignments 42 submissions
Adam Wiebner
shoulder practice! This is a warm up process following some of suggested practices in the lesson. I am curious to learn other artists routines for warm ups
LESSON NOTES

Holding the Pencil

There’s two common ways to hold your pencil while drawing:

Tripod Grip

drawing tripod grip

Holding the pencil with your thumb, index and middle fingers, like writing. This grip is more comfortable for using the tip of the pencil. Not practical to use the side. It’s also comfortable to control with your fingers to draw very small precise lines. So, it’s good for small strokes and thin lines that are uniform in weight.

Overhand Grip

drawing overhand grip

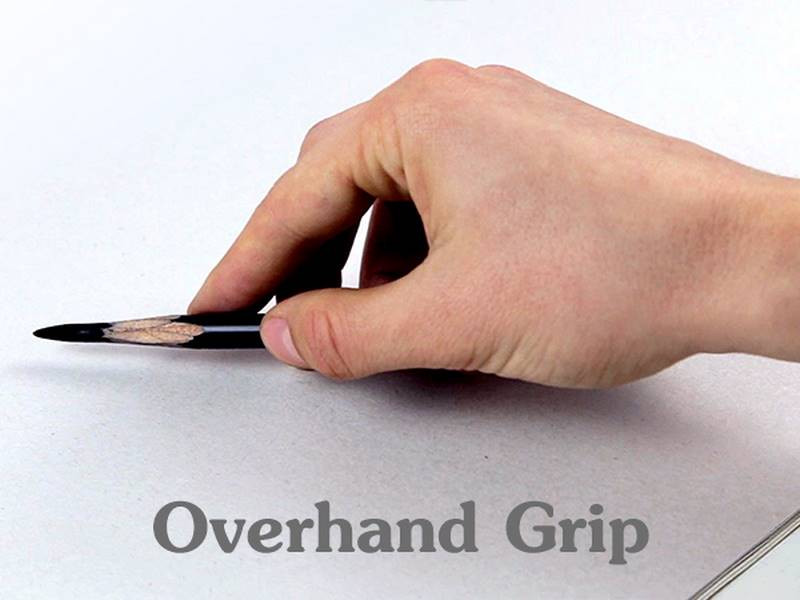
Holding your hand over the pencil. Your hand should be relaxed with the fingers and thumb lightly holding the pencil. You can still use the tip of the pencil by one of two ways. If drawing on a horizontal surface like a tabletop, simply bend the wrist forward a bit. If drawing on a vertical surface such as a pad resting on your knees or an easel, you can flip your wrist upside down to use the tip. Along with the tip, the overhand grip allows you to use the side, which is much more versatile than the tip. You can get thick soft lines, thin lines, and a transition between the two.

Controlling the Pencil

Wrist

The wrist serves well for small strokes and details.

Since grade school we are accustomed to using the pencil for writing. Since writing only requires our wrist, we have decades of muscles memory developed for handling the pencil with our wrists. Though there’s nothing wrong with using our wrist when it makes sense, we would be limiting ourselves if we didn't go beyond the wrist.

It’s ok to use your wrist and hold the pencil with the tripod grip for smaller details, but watch out for this...

Since using your wrist doesn't allow longer strokes, we end up drawing a bunch of short lines to create one longer line. This can get messy and you may end up with hairy lines.
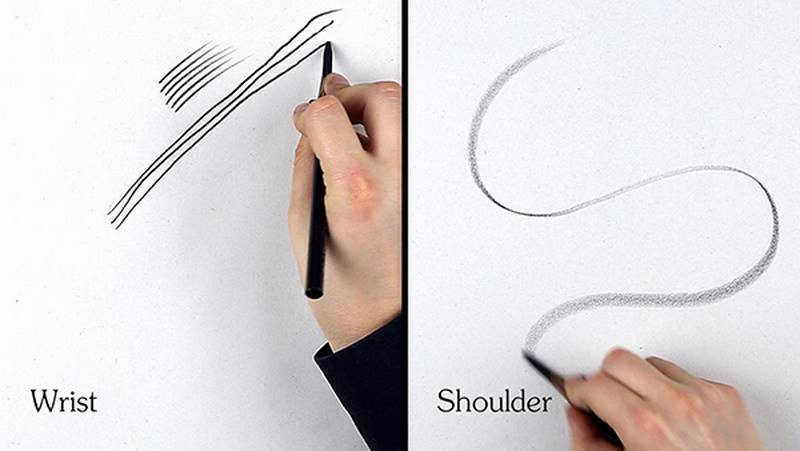
use the shoulder and wrist to control the pencil

Shoulder

The shoulder serves well for short AND long strokes. It’s much better for steady lines and fluid gestural lines.

Your shoulder provides a greater range of motion than your wrist. So, when drawing larger shapes, curvy lines, use your shoulder. This is especially useful for gesture drawing. Once you need to add some little details, you can switch to the tripod grip.

Using the Overhand Grip

Holding the pencil overhand allows you to use the side of the pencil. When sharpened correctly (as I explained in the pencil sharpening video..) this allows you to get larger strokes of tone. If you press lightly and layer one stroke over another, you can get soft gradations.

You can roll the pencil forward or backward to control the thickness and edge quality of the line. Use the area closer to the tip for a thinner sharper line and use the middle for a thicker softer line. And everything between..

Also, you can change the angle of your stroke to control the line thickness. Stroking perpendicular to the length of the pencil creates a thick line like I just showed. Pulling the pencil downward, parallel to the length of the pencil creates a thin line. So you don’t need to use the tip, though you can..

With a slight turn of the wrist while you’re pulling the stroke, you can create a line that changes from thin to thick.

This variation in line weight adds a good dynamic to our drawings. It’s kind of like using a calligraphy pen instead of a ballpoint pen.

The combination of an overhand grip and using your shoulder allows for the widest range of motion and line type. Most of the drawing can be done this way.

Muscle Memory

When we first start holding it like that it feels weird because we don’t have good control of our shoulder. We've only practiced using our wrists to write. We need to train our shoulder. It’s like playing sports. Repeat the motion so many times that it becomes intuitive.

Our friends at Wikipedia say Muscle memory is

"a form of procedural memory that involves consolidating a specific motor task into memory through repetition. When a movement is repeated over time, a long-term muscle memory is created for that task, eventually allowing it to be performed without conscious effort. This process decreases the need for attention and creates maximum efficiency within the motor and memory systems.”

So, at first, drawing in this new way is a distraction. Our mind has to focus on moving the shoulder correctly instead of making decisions about the drawing. Fight the temptation to revert back to just using your wrist with the tripod grip. Overtime as you develop the muscle memory you won’t need to think about it and you’ll use the pencil like a Jedi master.

“Patience you must have my young padawan” - Yoda

Exercises

  • Start training you shoulder by filling pages of curves, circles and straight lines.
  • Draw two dots and connect them with a straight line to train your hand eye coordination.
  • Or draw 4 dots and connect them with an ellipse. Try “ghosting” the lines first by practicing the motion before making contact with the paper. This is a great warm up before starting your drawing session.
  • You can also practice controlling your line weight by shifting your curves from thin to thick.

Or if you struggle with filling in large areas with clean tone, then draw a 6x6 inch square and fill it in with a clean tone.

It helps to shade only on the down strokes and lift the pencil off the paper on the way back up.

Focus on keeping stroke distance and pressure consistent.

A very good exercises for hand-stability and pressure sensitivity. If you end up with dark and light lines, it means either your stroke distance or pressure is inconsistent.

DOWNLOADS
txt
how-to-hold-and-control-your-pencil-transcript.txt
6 kB
mp4
How to Hold and Control Your Pencil.mp4
290 MB
ASSIGNMENTS

Make sure you have a well sharpened pencil and do these exercises as you warm up to draw. 1. Train your shoulder by filling a page with curves, circles and straight lines 2. Train your hand-eye coordination by drawing 2 dots and connect them with straight lines 3. Draw 4 dots and connect them with an ellipse. Ghost it first! 4. Practice controlling line weight by drawing curves and shifting the line weight 5. Practice clean shading by drawing a 6×6 square and fill it in with even tone

Newest
@drodriguezamador8
I don’t know how I’m doing
@drodriguezamador8
Do you draw tapered lines with the tip of the pencil
@drodriguezamador8
Do you use your wrist to draw circles or just your arm
Julian Müller
Circles are almost always drawn from the shoulder, no matter the size. There is just a larger range of motion available from that joint, even though it may take some getting used to at first
@drodriguezamador8
will the ghosting method help with drawing this
Jacob Granillo
Ghosting helps with good line quality, basically to draw any lines with precision and yes ghosting helps with drawing egg shapes and drawing that
@drodriguezamador8
Will the ghosting method work for drawing egg shapes
@drodriguezamador8
Which is better for drawing tapered lines/strokes tripod or overhand
Melanie Scearce
I'm sure everyone has their own preference but I find that I can get much more gestural tapered strokes with an overhand grip!
hArtMann
2yr
Tried the overhand grip digitally, definitely need to practice more to get that muscle memory going.
@night9
1yr
Didn't proko say in another video that you normally use tripod grip for stylus with the same arm movements as you would use in overhand grip?
@lassek
2yr
Im having a hard time controlling the line weight when using the overhandgrip. Should I sharpen the charcoal often or is it better to focus on the angle of the pencil?
Samuel Sanjaya
I still have some trouble with shaving the pencil, and I think that's the reason my shading looks choppy. feedbacks/critiques are welcomed.
faye zhang
3yr
These were really fun, and my shoulder is sore now. For anyone who is new to the overhand grip, please don’t give up like I did years ago. It will feel strange at first, but you’ll be more adjusted after some practice. Your drawings will benefit from having cleaner lines that just flow.
*Reworking Profile* From The Game.
19/3/2023 Day 22, trying to draw a Side walk with simple cubes as buildings, I understood the basics to I’m proud for that.
Benjamin Green
Good job! Perspective is hard and takes a lot of practice. I will give you one bit of advice here that will help you reach your goal faster. When beginners start learning perspective a common mistake is drawing outside of your cone of vision. This concept is very technical, and I won't go into a lot of detail on this (involves terms like station point, diagonal vanishing point, etc). From an artist perspective, it is easy to visually understand that when you draw outside of the cone of vision, the shapes will look distorted. If you make sure that you frame your pictures in such a way that the shapes are generally closer to the horizon line, and that all the angles on the front facing corners of the boxes are greater than or equal to 90 degrees (obtuse), you'll avoid visual distortion and this will improve your drawings. If your boxes look skewed, try making sure that the front angle is wider and also the depth should look a lot thinner as it gets closer to the horizon. Keep up the good work =D
squeen
3yr
Not to be a jerk and burst your bubble, but the tops of the building need to recede towards the vanishing point in exactly the same way you did the bottoms. :)
*Reworking Profile* From The Game.
17/3/2023 Day 21 of Marc Brunet’s Schedule, this time it’s 1 point perspective practice, I think I get the basic gist of it having a 25 mins draw session. Criticisms welcomed.
*Reworking Profile* From The Game.
13/3/2023 Day 20 of Marc Burent’s Schedule. From now on I’ll post an image of the reference! (Which I should’ve done at the start tbh) Criticisms are welcomed.
*Reworking Profile* From The Game.
11/3/2023 day 19 with Marc Burent’s Schedule, this time I had to draw a complex, curved in set of volumes. It’s supposed to be consistent of Cubes but it didn’t work out too well. Criticisms are welcomed.
Benjamin Green
Keep up the good work. Try to imagine the convergence of the parallel lines going back into space as they approach their vanishing points. This will ensure your objects are grounded properly. Hope to see more!
*Reworking Profile* From The Game.
8/3/2023 Day 18 of Marc Burent’s Schedule. Stacking different shapes on each-other, though I felt I could’ve done a lot better, especially with overlapping the shapes.
*Reworking Profile* From The Game.
7/3/2023 last few days of Marc Burent’s schedule. Don’t have too much to say about it tbh. Criticism is welcomed.
*Reworking Profile* From The Game.
28/2/2023 Days 11,12 & 13 Respectively. Each task containing some new surprises and challenges applied with them. Marc Burent’s schedule continues! criticism is welcomed.
*Reworking Profile* From The Game.
23/2/2023 Working on the last few days I haven’t posted yet. criticism is welcomed.
*Reworking Profile* From The Game.
19/2/2023 Day 7 of Marc Burent’s Schedule! This time I was Drawing Cubes floating in “various” angles! (Even though I don’t think I tried to bring variety due to lack of perspective knowledge). Note to Self: Next time look up References of Cubes in different angles before attempting.
@kugeltisch
Hi Crimson, love the dedication! :D if you are searching for perspective Knowledge here is a site that explains drawing a cube really great: https://drawabox.com/lesson/250boxes
*Reworking Profile* From The Game.
18/2/2023 Day 6 of Marc Burent’s Schedule. This time I was tasked with drawing more complex shapes, (which was hard to even start thinking about, honestly). I don’t think anything I did was anything too complicated, I think the was you needed to start with something simple, before then playing with the shape’s form. all Critcs are welcomed!
Help!
Browse the FAQs or our more detailed Documentation. If you still need help or to contact us for any reason, drop us a line and we’ll get back to you as soon as possible!